
For many of us out there in the world, the long and cold winter months bring the inescapable toil of chopping or chainsawing wood as fuel for heating their homes.
A lot of people only deal with needing wood for heat a few times a year. Whether it’s a weekend skiing or a summer camping, chopping wood for a fire is few and far between.
But for some of us, wood is a daily necessity. It’s how we heat our homes, cook our food and make our living.
When this is the reality, an axe or chain saw becomes a bit of a hindrance to our productivity and physical health.
A hydraulic log splitter can significantly reduce the effort you need for this endeavour.
You can even get some pretty inexpensive budget log splitters for at home and smaller jobs.
With this article, we discuss how to make one in a few easy steps.
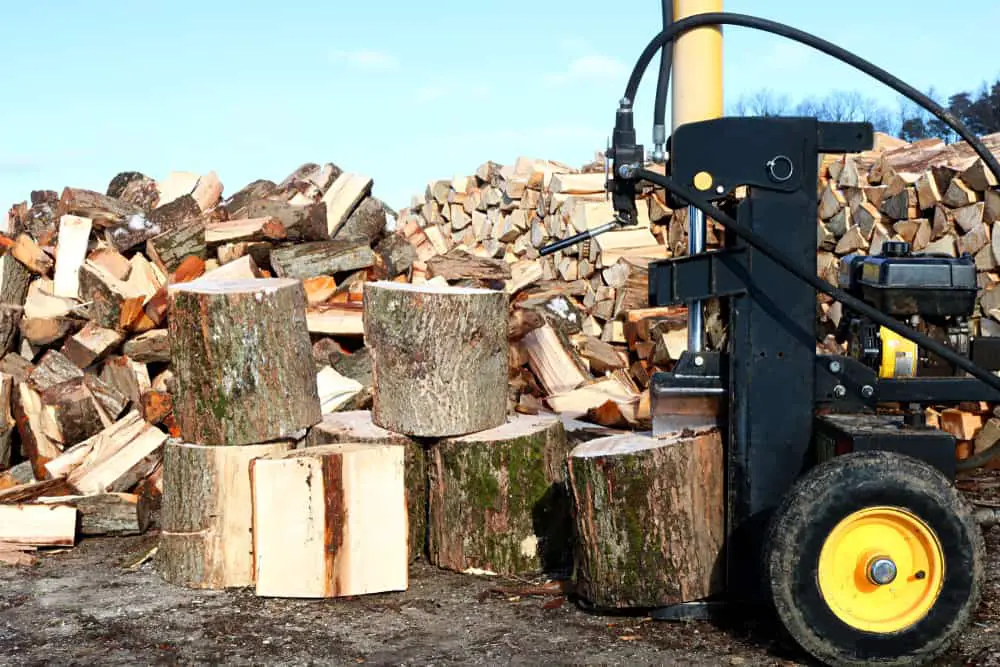
To build your own hydraulic log splitter, you’ll need the following components. These elements are all essential for a complete, home-safe splitter:
- A wood splitter blade for splitting the wood
- A splitting wedge that sits the splitter blade
- A hydraulic control valve that controls the blade
- A hydraulic ram or cylinder
- A hydraulic pump that powers the ram
- A hydraulic fluid tank with hoses to connect to the other components
- And an electric motor or other power sources to power the whole apparatus
Building a hydraulic splitter is not the toughest job in the world for the sworn DIYer.
Once you acquire and correctly assemble these components mentioned above, you will have a fully functioning hydraulic log splitter.
Then, you can proceed to cut up your logs with ease.
However, to build a splitter that maximizes safety and efficiency, saving you time and money, there are few other nuts and bolts you should keep in mind.
Related Reading: What Size Hydraulic Cylinder for Log Splitter?
How to Make A Hydraulic Log Splitter for Maximum Efficiency
Step 1: Choosing the Power Source
The two popular power sources you can choose from for your hydraulic log splitter are electric and gas.
Electric splitters are typically less powerful when compared to their gas-powered counterparts.
Furthermore, with these units, you also have to deal with the fact that you must be near an electrical power outlet during operation.
Electric splitters are perfect for more simplistic work around the house, especially in homes with limited firewood needs.
If you’re only in need of occasional log splitting, this option is the better way to go.
Gas-powered units, on the other hand, are pretty much the industry standard as they often pack a punch, and you can operate them with being tied to a specific location.
For the firewood needs of the typical American, either gas or electric is the way to go.
Tip: For gas-powered splitters, to achieve maximum efficiency, we recommend a four-stroke gasoline engine that outputs at least five horsepowers
A third, far less common alternative is the tractor-powered units that feature almost exclusively in farm and forest commercial operation.
This type of splitter isn’t relevant to most readers of this article, but it is a type of splitter, so I’ve included it to be thorough.
Step 2: Choosing the Splitter Orientation
Before you begin the construction of your Hydraulic log splitter, another important choice you must decide on is the splitter orientation.
Tip: To protect your back from strain and injury, you should also consider some form of log lift mechanism for your wood splitter.
Popular options include a parallel log lift arm or a cable winch-operated unit.
Depending on the available space, the positioning of your platforms and tools, and the log sizes you are dealing with, you may choose a splitter with a hydraulic ram that operates vertically or horizontally.
Step 3: Building the Main Platform
The frame of your hydraulic log splitter is one essential part of the structure as it provides support to all the other components.
This platform also forms the axle for the hydraulic ram and the holder for the wood you are splitting.
Tip: I recommend at least a 3 x 6 x 36-inch tubing that is at least a quarter-inch thick.
To guarantee your safety and maximum efficiency of the mechanism, you should use solid metal tubing for the entire structure.
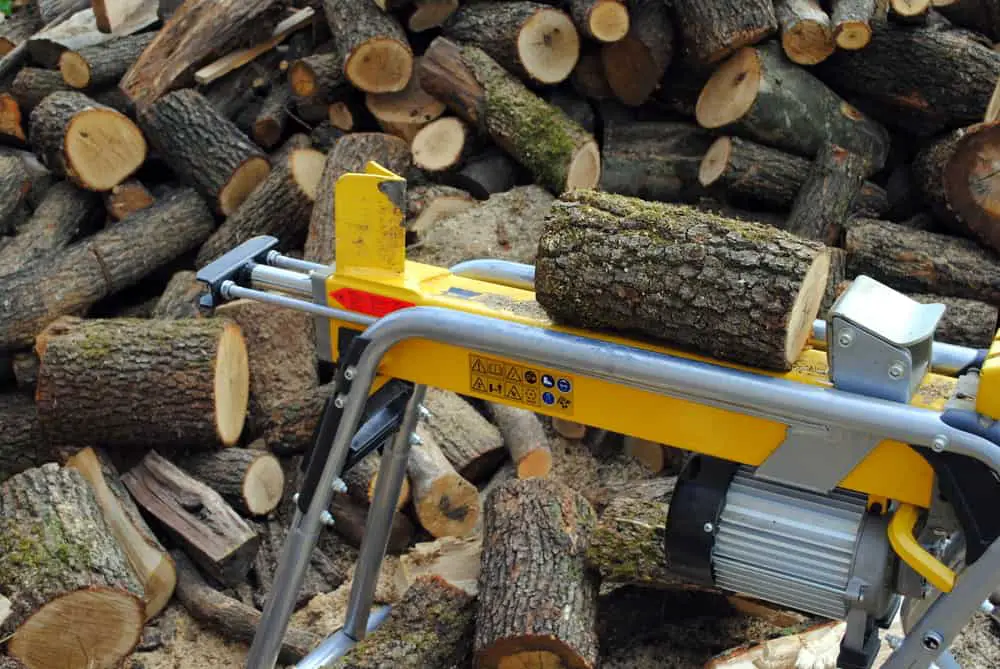
Step 4: Mounting the Hydraulic Pump
To mount the hydraulic pump:
- Mark out a position for the pump at or near the center of the axle platform
- Cut a bracket for the pump from a piece of half-inch metal using a plasma cutter or a cutting torch
- Once you have the bracket, line up the screw holes for the hydraulic pump onto the metal sheet and drill the holes out.
- Now, go back to the location you selected on the axle platform and drill the holes for the mounting bracket
- Then bolt the bracket onto the platform with stainless steel nuts
- Finally, you can now secure the pump to the bracket with matching stainless steel nuts and bolts.
Tip: Use a positive displacement type hydraulic unit with your setup to guarantee maximum efficiency with the high viscosity of hydraulic oil. Centrifugal pumps can be quite inefficient with liquid with moderate to high viscosity.
Step 5: Attaching the Cutting Blade
Another critical component of any hydraulic log splitter is the cutting blade.
The three main types of cutting wedges you can choose from are the simple two-way head, a more complex four-way option, or a six-way splitting wedge that is more common in commercial operations.
Alternatively, you can choose to build your own wedge with pieces of flat metal.
Once you have a suitable cutting head, place it on the platform in line with the hydraulic pump and about 6 inches from the edge, then weld it securely in place.
Tip: For maximum cutting efficiency, your cutting head must be sharp but also wide enough to split the logs on your property.
A properly calibrated cutting wedge should be snug enough to prevent any jamming or twisting during operation, yet operate freely to guarantee smooth functioning
Step 6: Connecting the Hydraulics
The hydraulic cylinder and ram combo is the cornerstone of the log splitter, as it is the component that pushes the wedge into the log splitting it.
To set up the hydraulics for your splitter:
- Drill mounting holes for the component on the axle platform
- Next, bolt the hydraulic unit to the platform securely with bolts
- Then, attach the control valve to the hydraulic unit if it comes separately
- Finally, connect the hydraulic lines from the pump to the ram
Once you have the hydraulics correctly attached, your splitter is ready to begin pumping hydraulic oil and splitting some logs.
Tip: Ensure that your hydraulic system contains a pressure relief valve for safety reasons. Make sure to use pipes rated to withstand a pressure of 2500 PSI or higher
Ensure that you secure the cylinder at both ends and only use non-detergent motor oil or clean hydraulic oil with your log splitter.
Step 7: Splitting Logs
Now, you have a fully functional hydraulic log splitter, and the only thing that is left is to begin cutting up some wood.
To use the splitter:
- load the logs one at a time onto the axle platform between the wedge and the edge of the platform
- Use the hydraulic lever to control the ram, pushing it into the log to split it
- Rotate the log pieces and repeat as necessary

Conclusion
If you decide to build your own hydraulic log splitter, remember that it is safety first with any form of heavy-duty DIY machinery.
Hence, while you can make alterations to the contraption to suit your unique needs, ensure that all the components are secure and rated to handle the pressure the machine will produce.
With our guide and a focus on safety, you can have your DIY hydraulic log splitter set up and cutting up logs with maximum efficiency in no time.